In this guide, we will show you how to install and use Terraform on CentOS 8. Before we proceed further, what is Terraform? Created by Hashicorp, Terraform is a free and opensource declarative coding tool that allows you to automate and manage your IT infrastructure and various services that run on servers. In fact, Terraform is popularly referred to as ‘Infrastructure as a Code’ tool.
Terraform makes use of a simple syntax to efficiently and safely provision resources across on-premise and cloud platforms such as Microsoft Azure, Google Cloud Platform and AWS. Where required, it can also re-provision these changes in response to changes in configuration.
Without much further ado, let us walk you through the installation steps.
Installation of Terraform on CentOS 8
First up, head over to the official Terraform download site and download the latest zip file. By the time of writing down this guide, the latest version is Terraform 0.13.3. To download use the wget command as shown
[james@linuxtechi ~]$ wget https://releases.hashicorp.com/terraform/0.13.3/terraform_0.13.3_linux_amd64.zip
Once downloaded, unzip the file to the /usr/local/bin path using the -d switch as shown.
[james@linuxtechi ~]$ sudo unzip terraform_0.13.3_linux_amd64.zip -d /usr/local/bin
Archive:  terraform_0.13.3_linux_amd64.zip
  inflating: /usr/local/bin/terraform
[james@linuxtechi ~]$
Alternatively, you can locally unzip the file in your current working directory and later move the unzipped directory to the /usr/local/bin destination.
[james@linuxtechi ~]$  unzip terraform_0.13.3_linux_amd64.zip
[james@linuxtechi ~]$  mv terraform /usr/local/bin
To confirm that everything went as expected, invoke the following command:
[james@linuxtechi ~]$ terraform -v
Terraform v0.13.3
[james@linuxtechi ~]$
And that’s it! We are done installing Terraform. The output confirms that Terraform is successfully installed on our system. As you can see, installing Terraform is quite a simple and straightforward procedure.
Terraform in action – Deploying a VM in GCP
To get a better understanding of how Terraform can be used to provision resources, we are going to demonstrate how to deploy a vm on Google cloud.
But first, you need to have a Google Cloud account with billing enabled. Usually, you get $300 worth of free credit during your free trial. In this demo, we are using a free trial.
Once you have logged in, click on the cloud shell icon as shown
This will initialize the Google cloud shell at the bottom of your screen. This usually takes a few seconds.
Next, we are going to install Terraform locally using docker to make it more convenient. To make it more persistent on restarts, we will install it into $HOME/bin as shown.
$ docker run -v $HOME/bin:/software sethvargo/hashicorp-installer terraform 0.13.3
$ sudo chown -R $(whoami):$(whoami) $HOME/bin/
Next, add bin to the path as shown
$ export PATH=$HOME/bin:$PATH
At this point, terraform is installed. Next, you need to enable the Cloud Engine API to make the API available for use.
$ gcloud services enable compute.googleapis.com
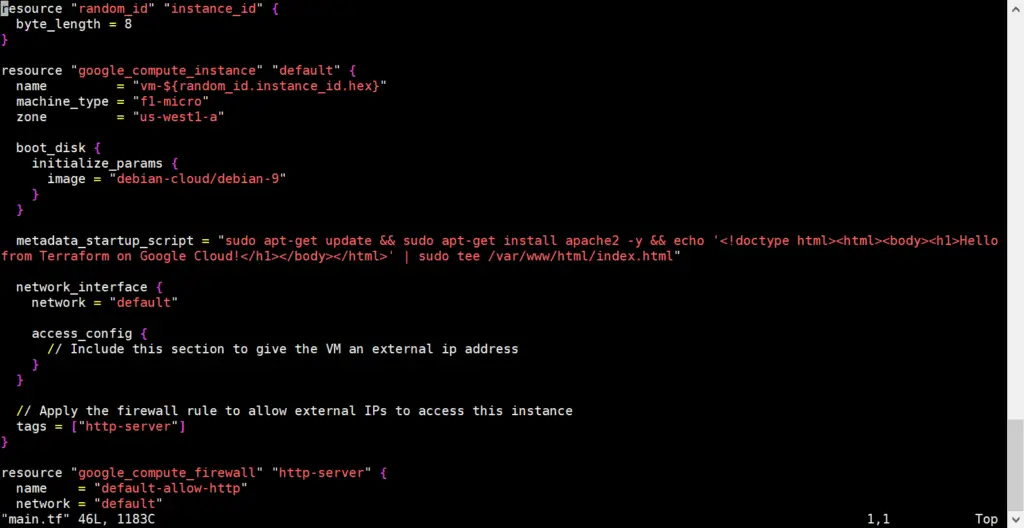
We are going to download a terraform configuration file from Github. The configuration file initializes a compute instance (virtual machine) that installs Apache webserver with a custom configuration. The compute engine is assigned a unique name and an external IP address that you will use to access the webserver. To download the config file, run:
$ curl -sSfO https://raw.githubusercontent.com/sethvargo/terraform-gcp-examples/master/public-instance-webserver/main.tf
Use cat command to view the contents of main.tf file
$ cat main.tf
Here’s just a snippet of the file.
Using terraform command, proceed and initialize terraform to download Google’s latest version and random providers.
$ terraform init
If all goes well, you will get a notification at the very end showing you that Terraform has been initialized.
To validate the configuration syntax and have a glance of the expected outcome run the command below. In the output, Terraform creates a google compute instance, a google firewall rule together with a random_id resource among other things
$ terraform plan
To apply the changes, issue the apply command as shown.
$ terraform apply
At some point, you will come across the output below. Type ‘Yes’ and press ‘ENTER’ to proceed.
After the completion of the application process, you will get the output shown as a confirmation that everything went on just fine.
Right at the bottom, the external IP address of the compute instance will be displayed. Copy and paste it on your system’s browser and view your instance’s welcome page as shown.
Bravo! We have managed to deploy a virtual instance using Terraform. When you are done and no longer require it, simply invoke the command:
$ terraform destroy
Once again, type in ‘Yes’ when prompted to discard the instance.
That was a brief overview of just how useful Terraform can be in deploying cloud resources. It’s our hope that you can now comfortably install Terraform on CentOS 8 and get started with provisioning your resources and managing different services.


Thanks for the very useful post.